The wall insulation went pretty well, other than some grommets ripping out. "S" hooks are provided to hang the insulation from the cable while you get it set up. Great idea, but the grommets much too easily rip from the insulation. We hadn't wanted to just staple everything in place as we went because we wanted to be sure of a nice smooth wrap, but we had to do a lot of that as we went due to the grommet situation. (The "S" hooks are also used to hang the wall canvas temporarily. They are later removed and replaced with zip ties securing both wall insulation and wall canvas to the cable.)
We got both wall insulation and canvas done and they look nice and smooth for the most part. You then lace a rope through the wall canvas grommets on the bottom and cinch it tight. This rope stays. For folks who build a raised deck, the rope is cinched below that deck. Due to our setup, we added some short pieces of board screwed into the bender board all the way around and our wall is cinched below those boards.
Next up was the roof liner. This comes in two pieces and is an ecru color. We thought we understood the directions correctly, but we just couldn't make it work. We ended up spending at least two hours on something that should've been pretty darned fast. In the end, we realized that one piece was smaller than the other and they both should have been the size of the larger piece. We couldn't actually get 100% coverage. There was a small gap that I used a scrap piece (trimmed from edge overhang) to cover. It looks OK, but we did stretch things really tight and stapled to the rafters so I'm hoping we don't have any tearing of fabric. Next up was the roof insulation. That went smoothly. It was also in two pieces, but these were the correct size. The last bit of the roof and the last thing we were able to get done due to daylight running out on us was the roof vinyl. Brent and I were able to heave it up through the center ring (I kept him on the ladder and he heaved). From there, Brent worked to unroll it sideways. The roof vinyl is all one piece and there's only a tiny hole in the center ring. Ronnee-Sue and I worked from outside to help unroll it. We got it on, mostly unwrinkled and centered and then we secured it all with a rope pulled tightly around the yurt just under the rafters.
We had to hope for no winds (none were predicted), because we just couldn't get any further. It had been a pretty frustrating experience with the liner. Thankfully, everything else went fairly well.
 |
| Close up of snow/wind cross piece and short rafter |
 | ||||
| Keeper boards reinstalled over snow/wind uprights. |
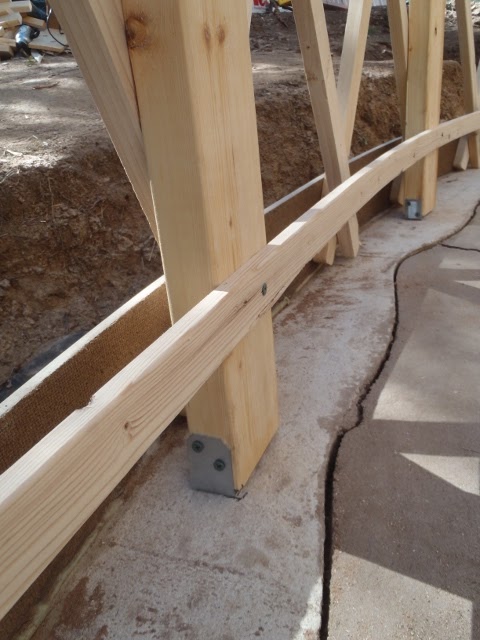
This is a close up of one type of bracket we used to attach the snow/wind upright (2x4) to our concrete grade beam. Another type we used as ACE was out of the first type, formed a "U" that the 2x4 sat in. Both worked equally well.


This is a close up of the insulation. We upgraded from just the regular silver "bubble wrap" type to one with a foam core.
Here we are putting up the wall insulation, hanging it temporarily from "S" hooks hung off the cable. It's then stapled into the lattice.

Here's Brent stapling the wall insulation.

Wall canvas going on to the "S" hooks. This color is called "blue teal". It is a bit lighter than the swatch that was sent, but we like it a little better. We didn't want anything too dark, but we didn't want the whole yurt tan either.

Canvas is on! Time to lace and screw in the bottom to the bender board.

Here we are putting on the roof liner. We used the long poles (with clean, non-snaggy ends) to help move the fabric as needed while being able to stand on the platform.

Here's the yurt with the roof liner draped. The one you see on the right is the one that was correctly sized. Lots of overhang on that one, as described in the manual.

Stapling the larger piece to the rafters. At this point, we still didn't realize the other piece was quite a bit smaller. We made it work well enough. We didn't have the luxury of waiting until the work week was going again and talking with the company and possibly having to wait for a new piece. This project is time sensitive.

Here's the roof insulation. At each long edge (they go over the center), there was a strip of sticky tape. We had to try and peal the protective paper layer off and then try and stick these two pieces of insulation together. It was a bit of a reach for sure.

Here you can see the orangey paper covering on the tape. We're trying to get it peeled off.

Here we've got the roof vinyl on. We're trying to make sure it's basically even all around - at least even enough to tie a rope around it to hold for the night.

Here we are trying to get that rope around it to hold it for the night. Not the best stopping place, but we had no choice. Once we made the decision to put that roof liner on and staple it down, we were committed to see the roof layers all the way through. It would have been fine if the liner hadn't been such a challenge.
We were on site doing this and cleaning up til dark. It was a very long day.
No comments:
Post a Comment