We went through a 9* night with no heat. It only got down to 27* in the yurt that night, so I was kind of impressed. However, it was just cold. We both found that we were just sort of always chilled, especially me. It seemed like if you never had a chance to warm up, then even a temp you normally wouldn't be cold at, you were cold. We wore a lot of layers, we went to bed early under a lot of covers and we stayed in bed late.
Our dog, Suki, even as hairy as she is wore a winter coat and had the use of my down sleeping bag. She also has one bed on top of another for good insulation.
Brrrrr!!!!!!!!!!!
Burrowed into my down sleeping bag for a cold night!
Hanging out on a chilly evening.
Finally, we thought we'd located all of the stove parts and were ready to install it, only to find out that the "through the wall kit" didn't come with the right adapter. You see, we chose to use double walled stove pipe so as to reduce the clearance required from combustibles. The yurt is small and we don't have a lot of space. Most people use single wall as it is cheaper and the kit had an adapter for that. You need an adapter to go from your stove pipe to your "through the wall thimble". So, we thought we found one at ACE only to find it was the wrong diameter. The fellow at ACE wanted to be sure we ordered the right part, so he put in a call to the company who made the kit. They never called him back, never emailed him back - three days he tried. I finally convinced him I knew what we needed and he ordered it for us. But, it wasn't going to come before we left for our Thanksgiving trip. So we went with out heat until we left. (I thoroughly enjoyed the heat and hot showers we had on our trip!!!)
We got back and the very next day went to pick up our part. Guess what? The warehouse sent the wrong damned part, even though the right one had been ordered. So, another order placed and two days later we had the right part. We installed the stove on a rather rainy day. Our well driller guy loaned us a fantastic massive drill that helped Brent get through some of the rotten bedrock stuff to get a hole deep enough for the chimney support. That saved him a huge amount of time.
We had decided to go through the wall rather than the ceiling for a few reasons. Most yurt companies recommend going through the wall. Fortress Yurt, whom we bought through, prefers through the roof. We were concerned about leaking issues if we went through the roof. We also weren't sure how we'd handle supporting the chimney if we went through the roof.
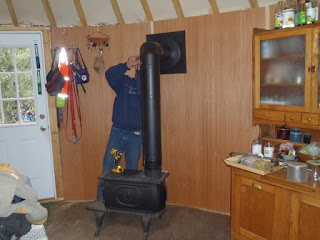
Here Brent had cut the hole in the paneling for the wall thimble to go through. The lattice will need to be cut out of the way too. He figured out this height basing off the height of the stove we bought (Logwood 1296E), the length of pipes we could get and clearance requirements. He wanted as long of a straight up run as he could get (within clearance requirements) before taking it out through the wall. In order to mark this, we put the stove in place, built up the interior stove pipe and marked the wall.
We built our chimney support from two 4x4 pressure treated 12 ft posts. We then used the metal clamps that hold the chimney pipe to the support to determine how far apart the 4x4 posts needed to be. We then cut quite a few 2x4 pieces to that width and screwed them into the 4x4s to hold them to that distance along their whole length and help stabilize the setup. Brent dug through decomposed granite and clay, rotten rock and then some bedrock in order to get the hole deep enough to seat these posts. We were loaned a great big dirt drill that help speed things along. We mixed sakcrete to anchor this in place. A couple of boards were used in different directions to help us level the support and keep it that way while the concrete cured.
Here's Brent cutting away the canvas.
This shows the wall thimble with outside part is flat on table. The longer black piece will be horizontal inside the yurt. Between it and the round black piece is where the hard-to-find adapter goes. That took some figuring out and was very frustrating. It didn't fit as snugly/tightly as we expected, so we kept wondering if we had it wrong. (Apparently not, as the woodstove is working just fine!)
The chimney is now in place. It has to be 2 ft above anything within 10 ft of it. We wanted to be sure we had a tall enough chimney for drafting well, but all this piping is VERY expensive. It's $100/3ft sections. We probably spent 3x for the stove and chimney pipe as we did on the woodstove. Anyhow, we had a longer horizontal run than we wanted, but had no choice as we didn't want to dig the hole for our support into our rubble trench foundation.
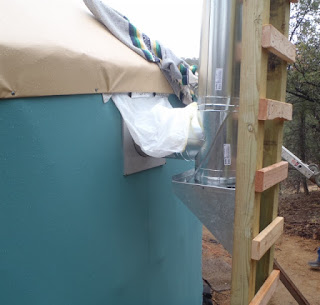
Here's a closeup of the outside of the wall thimble (sort of - we had the plastic in place to keep the rain from running off the roof onto the thimble which wasn't yet caulked). The short horizontal piece goes between the piece that is through the wall and the "T". The angular piece you see at the bottom is merely a support shelf for the chimney. The bottom of the "T" has a removable cap for cleaning out the chimney.
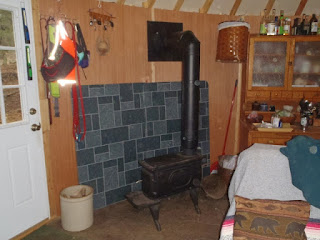
Brent is finishing up the stove pipe installation. We decided to turn the stove lengthwise along the wall because it took up less room within the yurt that way. It also felt much safer as our futon/bed is laid out in the middle and this keeps a great distance between the two.
We had to buy two stove boards, though, because of turning the stove this direction. We bought one inch metal spacers that go between the stove boards and the wall and they are raised up off the floor as well. Air needs to be able to circulate behind them. Doing this really allowed us to pull the stove in tighter to the yurt wall.
Another view of the chimney.
So, how's it working? Well, the first fire we lit in it nearly smoked us out. There was also an odd smell. I was trying not to worry that we'd bought too cheap of a stove or that we'd screwed up the installation. Both of us have lung issues and don't need to be breathing smoke! This stove is not air tight. It really isn't set up for you to have much control over the damper. It is right next to the yurt door and facing it, so opening the yurt door creates a vacuum that can suck smoke out of the stove if the stove pipe isn't heated up. I went and bought a few different kinds of fire starters to help get things going. Brent's mostly got it figured out. Get it going and get that stove pipe heated up. Try not to have to open the yurt door before then, but if you do, do it slowly. It does tend to want to let smoke out when you need to add wood or tend the fire. It has been holding coals pretty nicely. It seems over the week we've had it now, the earthen floor has warmed up and our yurt is staying pretty cozy even though the fire doesn't burn through the night. Sometimes we do find ourselves chilly at 3am, so we'll grab another blanket. But, Suki isn't needing her coat or my sleeping bag anymore. If I wake up chilly, then I will put a blanket on her, but I figure if she's truly cold she'll climb in bed with us.
It is so wonderful to not have to be bundled up all the time. It's nice to have your fingers working well enough to type! We did have to buy a cord of wood, just got it today. Our chainsaw has been in and out of the shop for months and they finally figured out what the problem is (oiler is broken). It will be fixed sometime next week. We'd been buying wood bundles at Tractor Supply and burning scrap lumber from building the solar shed. Tomorrow I'll be moving and stacking our new stash of wood!


