Monday, November 5, 2018

Yurt: Organizing

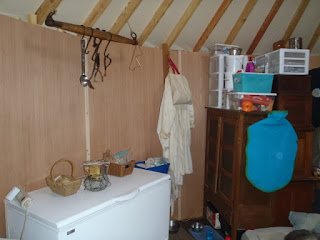
We have made a lot of headway in organizing in the yurt.  We still have other things to figure out, though.  In a yurt, wall and floor space are at a premium, so you want to use vertical space as much as possible.

Someone kindly left us an elk shed and it has made a great instrument and hat hanger.  We're using all kinds of plastic totes and three drawer bins to help organize as well.

We are still mulling over the cooking and sink arrangements, but that will come in time.

Here are some pictures:


To right of door.

Brent's work space.

Brent's work space.

Opposite door.

"Kitchen"

"Kitchen"

Added the ox yoke to hang pots/pans.

Clothing and dining.

Dining area.

Fridge and pantry.

Door.

Wood stove will be located here, so hanging things will be moved.

Futon.

We are pretty minimal on clothing, but have access to most of it in the storage container.  We can't stock up on groceries and right now aren't using the fridge.  Our power is limited unless we want to run the generator a lot (which we don't), so we're just using a super insulated ice chest for now.  Once the main solar array is done, our fridge will be no problem at all.  That will be nice!  Oh, for lighting we are using indoor/outdoor LED strip/tape lights.  They are stuck to the middle "ring" (the snow/wind load ring) of the yurt and provide all the lighting we need.  They are even dimmable and have multi colors and can do crazy patterns, should we wish to host a dance party.

Saturday, November 3, 2018

The First Few Days in the Yurt

We are on day 3 of Yurt Living.  Pretty much we are still trying to get organized.  The yurt is small, so we need to really think about what we need to have in it and what can be in the shipping container (8' x 20') that we have on site.  Currently, that shipping container is also housing our solar panels and other solar equipment until it is installed, so it's a bit cramped in there. 

Trying to organize has been moving one pile to another spot, to organize here, then moving another pile over there and trying to do some more organizing.  Today, we are actually seeing a bit of a difference, so we must be making progress!

Our current situation is that we have no real sink, no running water and no heat.  We won't have running water, but that's fine.  We aren't sure if we'll install some kind of sink (with bucket to catch waste water) or continue with the two dish pans that I'm currently using.  I'm not thrilled with my washing system at this point, but we'll get it figured out.

As for heat, we have a wood stove and just need to either find the time to install it or find someone to do it for us.  We'd rather find some one, but aren't having much luck yet.  Our first two nights it got to 28* outside, but a "balmy" 41* inside.  Not to worry - we have lots of warm comforters and blankets and we were toasty warm.  Suki has a nice winter coat to wear over night and one bed sitting on top of another: her princess bed.  She has been very comfy.  It's the mornings and evenings that are chilly.  Like sitting here typing this wearing a hooded sweatshirt, wool sweater and fleece vest....

Suki in her coat on her Princess Bed.


Once we have things fairly organized, I will share pictures.  We are definitely making use of the vertical space, so it is good to be tall.  But, I do have a small, handy step stool to help reach some things.

Our lighting is coming from some LED strip/tape lights.  They are fantastic!  Very low power use, and they can be dimmed and even have colors that will flash in various patterns should we ever host a dance party. 

We continue to be amazed by the wildlife here.  Two days ago we were visited by two javelina.  They were not at all put off by us and our voices and kept approaching. We finally decided it best to spook them off.  Yesterday, we had about 15 deer pass by to the east of the yurt, munching along the way.  Yesterday, Brent was out working on something and the trees were loaded with chickadees, bushtits and bridled titmice.  Today, there were mountain bluebirds out by the vehicles.

Power

Work on the solar power is proceeding.  We've had a huge hole dug near the parking area (8' deep x 4' x 4') into which a huge metal pole has been sunk and surrounded by a sonotube (30" diameter and 8 ft tall) that will be filled with concrete.  This sturdy pole will support our solar array for the yurt/house power.

Sonotube with grounding post and arc exiting.

Shows temporary supports for pole.


Grounding arc in case of lightning strike.


Concrete truck filling sonotube.

In the meantime, we are powered by our small generator and the "Solar Roller".  A handy dandy, small mobile solar unit made by the Cooper sisters of Cooper Power Solutions, LLC. 

Generator and Solar Roller.

Inner workings of Solar Roller.


Internet setup.


We are able to run our LED tape/strip light strings as well as our internet and laptops without trouble.  We haven't bothered with the fridge yet and are using a super insulated ice chest for now.  We only just moved in on October 31st, so are keeping things simple.  The solar Roller allows us to use the generator much less.  We also don't run power constantly.  We should be getting the main array set up within the next two weeks or so.  We may not bother with the fridge until then.  It means simpler meals and more frequent shopping trips, but otherwise isn't too much of a pain.


Yurt: Floor Finishing

So, we did the final coat on the floor about 3 weeks back now.  We wanted to add some beeswax to help harden the floor and give it a more finished look.  We heated the linseed oil and added the beeswax to it while on heat.  Once the wax was melted, the whole can it was heated in was brought into the yurt.  The first bout, had way too much beeswax and it was hardening up immediately.  So, we added more oil, reheated it and tried again.  I was very discouraged and concerned about whether to even continue.  In the end, we think we had about 2/3 linseed oil to 1/3 beeswax.  I think I might suggest trying 1/4 beeswax to 3/4 linseed oil, though ours ended up coming out OK.

So, basically, we ended up with, I think, too much wax on the floor.  Brent had to use a heat gun to melt the mixture on the floor and rub in what he could while also using a rag to absorb what the floor couldn't.  Meanwhile, I was working ahead of him, scraping off excess wax.  It was very time intensive.

We thought maybe we could buff the floor with a car buffer, to bring more of a finished look.  Nope, didn't do a dang thing.

Clearly we didn't quite get this part figured out right.  It looks OK, but has been tacky to walk on - you could hear your shoes sticking to it slightly.  That's gotten better over time.  Now that we are moved in, I did my first real sweeping today and it sweeps OK.  The bits of dog fur kind of wants to stick a bit, but that could just be that the floor isn't a slick surface.  The linseed oil/wax mixture definitely helped the "grouting" solidify and stay in place.


Linseed oil-beeswax coating.


This shows where the floor is done vs still overly coated in wax mixture.


Done!


Dunny & Shower

We'll be using a composting toilet while waiting on the house.  The yurt is awfully small, so we opted for a little dunny (outhouse) to host the composting toilet.  We are using the same system that we used for 7 years in Maine, though we had the composting toilet located in the bathroom in the house.

I wanted a lot of light and we also built this on a budget.  We used a horse stall mat for the floor and brought it up to the level of the 2 x4's framing the walls/door of the dunny.  We built the wall frames at the rental, like we did the solar shed.  Then we hauled them up to the property in our truck and put it all together.


Shows dunny location in relation to yurt.

Dunny in progress.

We used "grooved" paneling, usually used inside.  It isn't super smooth, though, so kind of rough and rustic.  I will be using boiled linseed oil on the outside to protect the wood.  I intend to paint the inside with an exterior paint to make it easier to clean.

Nearly finished.

I wanted a lot of light to deter spiders and keep it from seeming the dark, nasty outhouses of old.  I am afraid I may have gone over board and we will cook in it in the summer.  We'll see.  I may need to make some curtains, however, I think we'll enjoy it for sure this winter!

View from Dunny.

View through dunny window.

When siting the dunny, we considered ease of access from the yurt, a mostly level location to decrease our work and a good view.😊


Interior.
We made our dunny 4'x4'.  We hemmed and hawed a bit, looked on line for size suggestions.  Brent decided that a corner seat was more interesting.  He used a piece of the same grooved paneling and cut slices into it where it would need to bend and then steamed it.  It turned out great!

In Maine, we used stainless steel 5 g buckets, but they are VERY expensive and multiple friends of ours just use 5 g plastic buckets, so that is the route we went this time.  We've got two, but might get another for our rotation.

Corner seat.

Dunny door with window.
So, the window does look a little funny.  The roofing material it is made from only comes in one width.  That determined the height of our window.  We placed it such that you can see the view from the dunny while seated, as that was the main point of having a window in the door.


So, joining our little dunny is an outdoor shower.  We aren't finished with it yet, as we will be building a little surround for it.  But here's what we currently have.


We've got a leveled area right next to the dunny for our shower.  We took a nice pallet and sanded it, then linseed oiled it.  We have an old rubber mat with holes in it for standing on. 


We took a 3 gallon garden sprayer, cut off the plastic wand part from the hose it came with.  We bought 6ft of clear flexible hose and attached it to the cut off end of the black hose coming out of the garden sprayer.  See below.


We found a hose barb that fit into the black hose (also used a clamp on it) and a female end.  We were only able to find an elbow with the right sizing on both ends, but it works fine.  So that elbow barb screwed into the female end of the hose barb on one end and on the other the barb stuck into the clear hose (clamp again).  We attached our low water use shower head using the other elbow.  The male end screwed right into the shower head and then the barb end stuck into the clear hose (clamp again).  The shower head we used has an on/off lever which is very handy and we recommend it.


We intend to build a surround of opaque corrugated poly roofing.  That will help with keeping it warmer if the sun is out as well as provide some privacy.